Monday, January 18, 2021

Sourdough Starter

Sourdough Starter

Last year, yeast was very hard to find in most grocery stores.   If you like home-made bread, but you suddenly find that you can't get to the store, or the store's shelves are empty, you don't have to despair. You can still make home-made bread by using Sourdough Starter.  This starter has been known to last generations. 

Ingredients

2 c. flour
1 package active dry yeast
2 c. warm water

Mix the flour and yeast together in a 4 quart glass jar or a large bowl. Stir in water and beat until smooth.

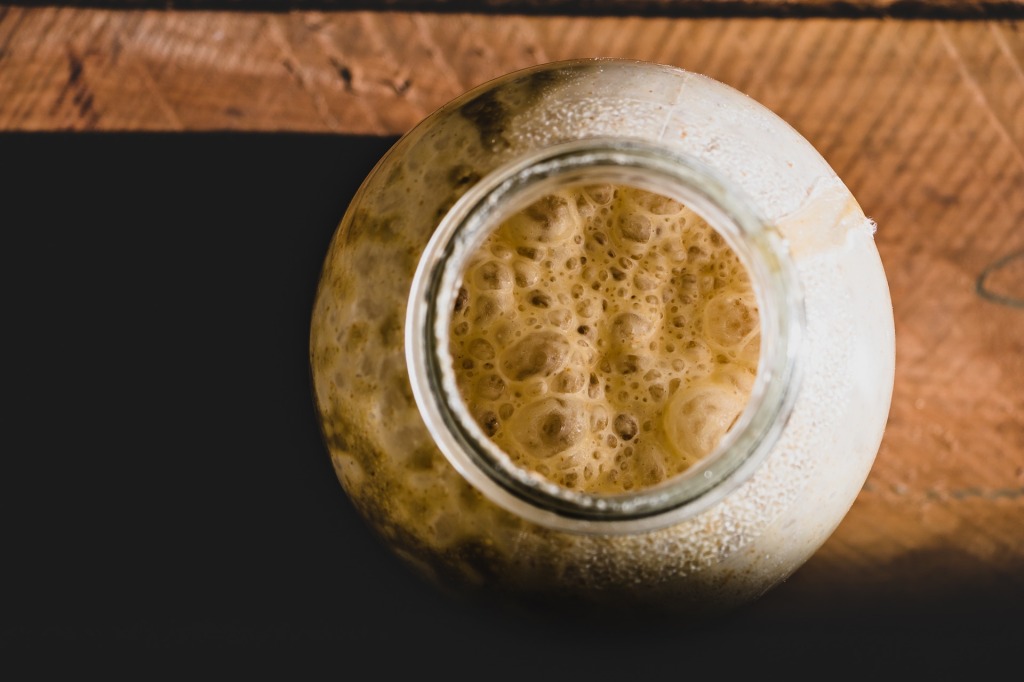
Cover loosely with a piece of plastic wrap, waxed paper or a kitchen towel. Let stand for 2 days or 48 hours in a warm location. Stir occasionally. The mixture should have a sour smell, have some bubbles and there will be some clear liquid on the top. However, if your starter turns a strange color, smells really bad or has mold on it, throw it away and start again.

When you are ready to use the starter, remove it from the refrigerator. Stir to blend the liquid that may have formed on the top. Remove the amount of starter you need to make your sourdough bread.

To replenish the starter

If you are going to be making sour dough bread once a week, you will have to give your starter some food to keep it going. You will need at least 1 cup starter left in your container and you will have a never ending supply . . .as long as you keep feeding it. 

Combine 1 cup flour with 1 cup warm water and beat until smooth. Stir into remaining starter. Leave at room temperature for a few hours until mixture begins to bubble. Cover the bowl or jar loosely and place in the refrigerator.

Remember, you will need to feed and replenish the starter once a week. If you don’t plan on using the starter for a week, discard half the mixture. Add 1/2 cup flour and 1/2 cup water into the sour dough starter and stir well.

 If throwing the starter away does not appeal to you, then place it in a container and gift it to someone who will enjoy baking sourdough bread as much as you do.You can also make biscuits, pancakes or pizza dough from it as well.

Sunday, January 17, 2021

Home-made Butternut Squash Pie

Butternut Squash Pie 


We were given butternut squash late in the fall.  Although I love to half it and bake it in the oven with butter, salt and pepper, I always have extra left over.  Instead of eating it for days, I use it to make a Butternut Squash Pie. It is just like Pumpkin Pie, but so much better.

Pie Crust Ingredients

1 c. plus 1 Tbs. flour
1/2 tsp. salt
1/3 c. shortening or lard
3 to 5 Tbs. cold water

Butternut Squash Pie Filling Ingredients

3/4 c. brown sugar
1 Tbs. cornstarch
1/1/2 tsp. cinnamon
1 tsp. ginger
1/2 tsp. nutmeg
1/4 tsp. salt
2 c. butternut squash puree  See recipe below
2 eggs
1/2 tsp. vanilla
1 (12 oz.) can evaporated milk 

Directions

Make the pie crust. In a medium bowl, combine flour and salt.  Cut in the shortening with a pastry knife or two knives held together until it resembles course crumbs about the size of small peas.

Add the cold water, one tablespoon at a time, stirring with a fork until all the flour is moistened and the pastry holds together. The water amounts vary depending on the amount of humidity in the air.

Form the pastry into a ball and place it in a plastic bag or wrap it in a sheet of plastic wrap. Refrigerate for 30 minutes. 

Remove the plastic wrap and turn the pastry out onto a lightly floured surface. With a floured rolling pin, roll the pastry out until you have a circle 2-inches larger then your inverted 9-inch pie pan.  To check the size of your pastry, turn the pie pan over so the open side is over the pastry.  If you have at least 2-inches of crust outside the rim of the pie pan, then it is the right size.

Carefully and loosely fold the crust into fourths and then place it in the pie pan. Unfold the pastry and position it so you have ample crust hanging over the rim and it is flush against the bottom and sides of the pie pan. Be careful at this point not to stretch the pastry. This causes the pastry to shrink while it is being baked. 

Flute the edge of the pastry as desired..

Bake pie crust at 350° for 1-2 minutes until crust starts to puff with small bubbles. This prevents the crust from being soggy.  Set aside to cool while you make the butternut squash pie filling.

In a large mixing bowl, combine the brown sugar, cornstarch, cinnamon, ginger, nutmeg, and salt. Mix to combine. 

Add the butternut squash puree, eggs and vanilla.  Stir until it is thoroughly blended together.

Pour in the can of evaporated milk, stirring to combine. 

Pour into prepared pie shell. 

Bake at 350° for 75 to 80 minutes or until  a  knife inserted in the center of the pie comes out clean.

Butternut  Squash Puree

Cut the butternut squash in half lengthwise. Scoop out the seeds and stringy stuff.

Place the cut side down on a baking sheet/  

Bake at 350° for 30 to 40 minutes or until tender. Scoop out the pulp while it is still warm and place in a bowl, leaving the outside peel. 

Place the pulp in a blender, food processor or use an emulsion blender.  Add 1 tablespoon butter and blend until it is smooth and silky.

Refrigerate leftovers up to 3 days. Or you can freeze leftovers for up to 3 months. When you want to use the frozen Butternut squash puree, simply thaw overnight in your refrigerator.


Saturday, January 16, 2021

Pineapple Hawaiian Dinner Rolls

Pineapple Hawaiian Dinner Rolls


These dinner rolls have just the right amount of sweetness, making them perfect for sliders, an accompaniment for any meal, or as a wonderful snack. They bake up fluffy and light, with a sweetness and unique flavor provided by the crushed pineapple.

Ingredients

1 Tbs. dry yeast
1/4 c. warm water
1 Tbs. granulated sugar
1/3 c. milk powder
1 egg
1/4 c. brown sugar
1 (8 oz.) can crushed pineapple, undrained
3 Tbs. butter, softened or oil
1 tsp. salt
3 1/4 c. flour

Directions

In a large bowl, mix yeast, warm water, and granulated sugar together.  Set in a warm location, so the yeast can bloom and grow for 8 to 10 minutes. 

Add milk powder, egg, brown sugar, crushed pineapple, butter, salt and 1 cup of flour.  Beat with a wooden spoon, or you can use a mixer with a dough hook attached, for about 2 minutes. This helps with the kneading process.

Continue to add and stir in as much of the flour as you can using a wooden spoon.  When it gets too hard to stir, place the dough onto a lightly floured surface.  Knead in the remaining flour, adding more if necessary, until you have a dough ball that is smooth and elastic. The dough should be slightly sticky, but no longer sticking to your fingers. This process usually takes about 10 minutes.

In the bowl you made the dough in, lightly grease the inside. Place dough in the bowl, turning once to grease all the dough's surface. Cover with a towel or plastic wrap and place in a warm location until doubled in size.  This take about an hour, depending on how warm your kitchen is. 

Punch the dough down and allow it to rest for 10 minutes on a lightly floured surface.  As the dough rests, grease a 9 x 13-inch baking pan.

Form the dough into 12 portions.  Roll each portion into a ball under the palm of your hand on a smooth surface. Place in the prepared baking pan. 

Lightly brush the tops with oil to keep them from drying out. Cover and place in a warm location until doubled in size.  This takes about an hour. 

Preheat oven to 375°. I often have my rolls rising in the oven with the pilot light. Then, when it comes time to bake, I turn the oven on. Bake for 15 minutes, or until the tops are done and are lightly golden brown.

Brush the tops of the hot rolls with butter.  For this step, I will take a stick of butter, open one end and then run the stick of butter over the top. 

Serve with butter. Or combine 2 tablespoons honey with 2 tablespoons melted butter for extra sweetness and flavor.

Friday, January 15, 2021

Saucy Chicken and Vegetables

 Saucy Chicken and Vegetables


This is a super easy dish to prepare, especially if you are tired and don't want to spend a lot of time in the kitchen.  You can serve this meal with rice, potatoes, or dinner rolls.  Best of all, it is a one dish meal, so you don't have a lot of dirty dishes to wash.

Instead of using plain bread crumbs, add more flavor by using dried croutons or stuffing mix.  You can also cut the chicken up into strips or cubes.

Ingredients

1 Tbs. butter
1 Tbs. olive oil
2 boneless chicken breasts, skinned and halved
Salt and pepper to taste
1/8 to 1/4 tsp. onion powder
1/8 to 1/4 tsp. garlic powder
1 onion, chopped
1 sweet pepper, chopped
1 (16 oz.) pkg frozen broccoli cauliflower mix
1 (10 3/4 oz.) can condensed cream of mushroom soup
1/2 c. sour cream
1/4 tsp. thyme leaves
1/4 tsp. parsley flakes
1/8 tsp. paprika
1/8 tsp celery seed
1/4 tsp. Tony Chachere's Original Creole Seasoning
1/3 bread crumbs

Directions

Sprinkle salt, pepper, onion powder and garlic powder over both sides of the chicken breasts. 

In a heavy cast iron skillet, melt butter and olive oil over medium-high heat. Add the chicken breasts and brown the chicken on all sides. Remove the chicken and set aside.

Add the frozen vegetables, onion, pepper and mushrooms to the skillet. Sauté until crisp-tender and the frozen vegetables are no longer frozen. Return chicken to skillet.  In a small bowl, combine the cream of mushroom soup, sour cream, thyme leaves, parsley flakes, paprika, celery seed, and Tony Chachere's Original Creole Seasoning. Give it a taste to see if it needs more salt or pepper.  Pour over the chicken.  Sprinkle bread crumbs over the top.   Bake for 1 hour, or until chicken is fully cooked.

Thursday, January 14, 2021

Pumpkin Ice Cream Squares

 Pumpkin Ice Cream Squares


Pumpkin isn't just for Halloween or Thanksgiving, it is good any time of the year. When you combine pumpkin and ice cream together, you get a delicious treat that is sure to please.  It is an easy dessert to put together and everyone will think it took you hours. You can add some nuts or cookies

Ingredients

1 1/2 c. graham cracker crumbs
1/4 c. sugar
1/4 c. melted butter 

Directions

Preheat oven to 350°.

Mix graham cracker crumbs, sugar and melted butter together. Press in the bottom of a 9-inch square pan.  

Bake for 10 minutes.

Remove from oven and cool.

Prepare the rest of the dessert recipe when the crust is cool.

Ingredients

1 (16 oz.) can pumpkin
1/2 c. brown sugar
1/2 tsp salt
1 tsp. cinnamon
1/4 tsp. ginger
1/8 tsp. cloves
1 qt. vanilla ice cream, softened

Directions

In a large bowl, combine pumpkin , brown sugar, salt, cinnamon, ginger and cloves together.  

Fold in ice cream.  

Pour the pumpkin mixture over the cooled graham cracker crust. Cover and place in the freezer. when the mixture if firm, cut into squares. 

Set out 20 minutes before serving. Top with whipped cream and pecans if desired.

Wednesday, January 13, 2021

Marble Squares

 Marble Squares

If you are looking for a soft, chewy cookie bar that is loaded with chocolate and marbled throughout the dough, then this recipe is perfect. It is so much easier then making individual cookies and they are the perfect treat for any time of the day.

Ingredients

8 oz. cream cheese
1/3 c. sugar
1 egg

Directions

Combine softened cream cheese, and sugar.  Add egg and mix well.  Set aside. 

Ingredients

1/2 c. butter or margarine
3/4 c. water
5 Tbs cocoa
2 c. flour
2 c. sugar
2 eggs
1/2 c. sour cream
1 tsp. soda
1/2 tsp. salt
6 oz. chocolate chips

Directions

Preheat oven to 350°. Grease and flour the bottom of a 9 x 13-inch pan. 

In a saucepan, combine butter, water and cocoa.  Cook and stir until it comes to a boil. Remove from heat.

Stir in flour and sugar until thoroughly combined. 

Add the eggs, sour cream, soda and salt.  Mix well.

Pour into the prepared pan. 

Spoon the cream cheese mixture over the batter.  Cut through the mixture with a dull knife to give it a marbling effect throughout the bars. 

Sprinkle chocolate chips over the top.

Bake for 35 to 40 minutes.


Tuesday, January 12, 2021

Banana Cake With Brown Sugar Frosting

 Banana Cake With Brown Sugar Frosting


If you find bananas on sale or just wondering what to make with them, this cake recipe is sure to please. It’s moist, delicious and so easy to prepare. It is a good way to use those over-ripe bananas and a nice switch from making banana bread. 

Ingredients

1/2 c. shortening
1/2 c. sugar
3/4 c. brown sugar
2 eggs
1 tsp. vanilla
2 to 3 ripe bananas, mashed up
1 tsp. baking soda
1 tsp. salt
2 c. flour
1/2 c. buttermilk
1/2 c. chopped nuts, (Optional)

Frosting

1/4 c. butter
1/2 c. brown sugar
6 Tbs. milk
2 1/2 to 3 c. powdered sugar
1 tsp. vanilla

Directions

Preheat oven to 350°.  Lightly grease a 9 x 13-inch cake pan. Set aside.

In a large bowl, cream together the shortening, sugar and brown sugar until light and fluffy.

Add eggs, one at a time, beating well after each addition. 

Mix in the bananas, vanilla, baking soda, and salt. 

Alternately, add some of the flour and then some of the buttermilk, beating well after each addition. 

Stir in the nuts if desired.

Bake for 25 to 30  minutes or until a toothpick inserted in the center comes out clean. 

Allow the cake to cool. 

Prepare the frosting.

In a saucepan, combine the butter, brown sugar and milk.  Stirring constantly, cook over medium heat until the mixture comes to a boil. Continue to boil for 2 minutes. Remove from heat and set aside to cool until the mixture is lukewarm. 

Stir in the vanilla. With a mixer on low speed, gradually add the powdered sugar. Turn the mixer to high speed and beat until the frosting reaches the right consistency for spreading on your cake.